|
|
 |
Urban Imaging:
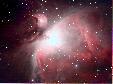
Because of light pollution, I usually can't see the objects I want to capture when I view through
the eyepiece. I use the CCD camera itself to locate targets for imaging. The Starlight Express
MX7C's field of view is 15 x 20 arc-minutes at f/4.3 with the 10" Meade LX200. That's a very narrow
field, comparable to an eyepiece at 180x. The high magnification, LPR filter, and red-sensitive CCD camera
all combine to spread out skyglow and boost contrast enough to locate targets. The LX200 is accurate enough to land
targets in that narrow field reliably. Here's the procedure I recommend:
- Limit the slew speed to about half of maximum.
- Perform rigorous polar alignment (see Polarali.doc) by drift method.
- Center and "synch" on a convenient bright star to align the "GoTo".
- Attach focal reducer, LPR filter, adapter, and camera.
- Roughly focus, then center the bright star while shooting multiple short images. Then "synch" again
if necessary.
- GoTo another star near the intended target. Be ready to kill the scope in case of camera crash or tangle
(turn on the lights if you have to).
- While shooting multiple short images, position the star somewhat off-center (to minimize coma in the final
focused image).
- Slip the Hartmann mask over the dew shield and complete focusing by aligning diffraction spikes in the normal
window and/or by squaring out the 3-sided blobs in the focus window.
- Then GoTo the intended target, again ready to kill the scope if necessary.
- Bin the pixels to 2x2 or higher and try short exposure times until the nebulosity is visible. Adjust
the contrast by adjusting the histogram to discard skyglow (slide past the first peak). Most objects are recognizable with
5 to 30 seconds exposure. If not then try longer exposures at full resolution.
- Use multiple short exposures to center the object. Binning will speed up the download times for this
step.
- If needed, shoot one longer exposure at full resolution to establish a proper exposure time (study the histogram).
- Shoot a short exposure at full resolution (hi-res selfguide), select a guide star, and enable autoguiding
(with S.T.A.R. 2000). Verify sub-pixel accuracy is achieved (or at least approached).
- Start an image sequence to capture multiple exposures. Be sure to check the first image download for
guiding errors before leaving the scope unattended. Sometimes you'll have to de-clutch the declination drive to
find a happy spot on the worm gear, which means repeating Step 3.
- Shoot multiple dark frames if needed.
Additional Imaging Tips:
- When using the Meade f/3.3 focal reducer, keep the spacers to a minimum. Otherwise the edge illumination
will be poor and coma will be severe. I now use the following combination in series: Telescope with standard
male SCT thread, f/3.3 reducer, Orion SkyGlow SCT filter, NO SPACERS, M42x0.75 by M42x1.0 adapter, MX7C camera.
This produces f/4.3 according to my measurements.
- The SkyGlow will filter the light less severely when it strikes at an angle, so hitting it
with f/4.3 rather than f/10 helps compensate for the focal reducer's light-loss at the periphery.
- LPR (light pollution reduction) filters work on objects other than nebulae when imaging in bright lights.
I routinely use them for star clusters. Occasionally I succeed at galaxies too.
|
|
|
|
|
|
|
|